To use visitor management in EZVolunteer there are several decisions and configuration steps that need to be made, both within the administrative console of the system and at each campus, if you are using the EZVKiosk to sign-in visitors.
School Logos
The EZVolunteer Visitor Module uses the school logo for each campus as a ‘default’ image to print on a visitor’s nametag when they sign-in, if the school is not using the Capture Photo functionality. For this reason, it is important to upload the logos for each campus into the Schools Module of your system.
To do this follow these steps -
-
Sign-in to EZVolunteer and go to the Administration Console
-
On the page header go to Settings > EZVolunteer > Schools
-
From the list of schools click the campus for which you want to upload a logo
-
In the logo section click CHOOSE FILE
-
Select the image file logo for that school
-
Click the UPLOAD button and then SAVE to return to the school list
-
Repeat Steps 3 - 6 for all schools
Visit Purpose
You have the option of categorizing the purpose of a visit when a visitor signs in (or is signed-in) at a campus. Purpose is a way to track and and report why visitors are on-campus. Purpose will appear on ALL campus sign-in pages for consistency district-wide.

To add or update your Visit Purpose follow these steps -
-
Sign-in to the district administration console
-
Go to Settings on the page header and under EZVolunteer choose General Settings
-
Scroll to the bottom of that page and in the ‘Purpose of Kiosk Visit’ section
-
Type a Purpose, like ‘Parent/Teacher Conf’, and click the ADD button
-
Repeat Step 4 for each new Purpose. Be sure to include ‘Other’ or ‘Miscellaneous’ as an option
-
When done click the SAVE button at the bottom of the page
Enable Real-time Screening
To enable real-time screening of visitors you will need to contact your Relatrix account manager. This is an optional service that will require you to purchase credits to run the nationwide Sex Offender Registry (SOR) check on each new visitor.
Once enabled on your site you can specify a ‘look-back’ period so that a visitor who has already been checked is not re-checked for a set number of days.
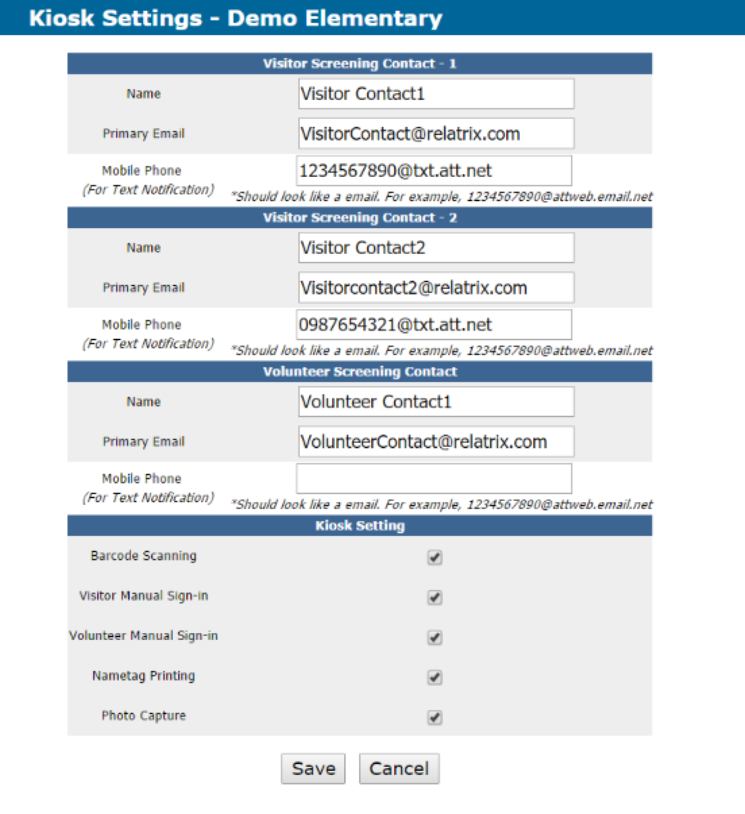
Campus Kiosk Contacts & Configuration
If you will be using the EZVKiosk to sign-in visitors there are several decisions and settings that need to be configured for each campus. To access these settings go to Settings > EZVolunteer > Campus Kiosks. Each campus using the EZVKiosk has it’s own settings and needs to be configured separately.
Campus Visitor Contacts are the people or departments who receive alerts from EZVolunteer related to visitors at that school. There can be two visitor contacts for each campus and each contact can have an email and SMS/text channel to receive. You will need to decide who the visitor contact(s) will be, typically one contact at the school and one at district security.
In addition to setting up visitor contacts you need to decide how to configure the EZVKiosk for each campus. Detailed description of the Kiosk Setup is available through our Tip Sheets & How To documents which are accessible from the admin console.
The campus kiosk settings determine what functions are enabled on the school’s EZVKiosk. These include -
-
Barcode Scanning - Check this box if you will be using a barcode scanner to sign-in volunteers and/or sign-out visitors you need to enable this function on the EZVKiosk. Requires a 1-D barcode scanner at the EZVKiosk computer.
-
Visitor Manual Sign-in - Check this box if you want to sign visitors into your kiosk.
-
Volunteer Manual Sign-in - Check this box if you want volunteers to sign-in with their account details in addition to, or instead of using a name badge with a barcode.
-
Nametag Printing - Check this box if you want to print name tags for all visitors and volunteers who manually sign-in. Requires a label printer at the EZVKiosk computer.
-
Photo Capture - Check this box if you want to include photos of your visitors in the database and on the nametags you print for them. Requires a webcam at the EZVKiosk computer and/or the front-desk computer where school staff sign-in visitors.